Rocket Motor
After choosing a propellant, we had proceeded with packing it in a suitable casing. While the design of the casing itself is based upon the design of the launch vehicle and the performance characteristics to be achieved, we arrived at a few generalized arrangements that is applicable to all rocket motors.
Revision - 01
Since this was the first motor built, it was difficult to know what we actually needed. The outer casing was decided to be built from carboard. As there was no standard cardboard tube that could fit in the motor mount, a custom one was built with rolling layers of newspapers with glue. It was anticipated that paper-glue-paper layering would provide the required strength.
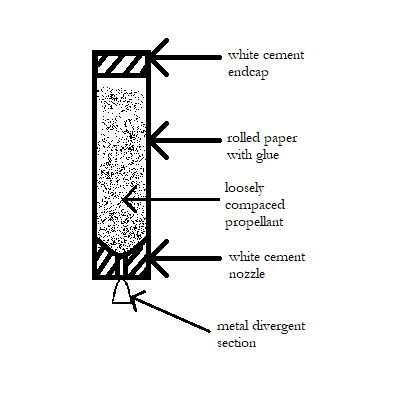 |
| rev 01 motor design |
For the nozzle bore and the endcap, white cement had been used due to its strength and heat resistant properties and also because we didn't have any other material that could be moulded. First the nozzle was casted with a borehole, along with it, a tiny divergent section was added (seriously I don't know why!). Similarly, another piece was casted without the bore that acted as the endcap. The endcap was manufactured to be removable.
Once, the setup was dry, the propellant was loosely packed into and the endcap was sealed, ready to be fired. No wonder that this approach failed, spectacularly.
Revision 02
The failure of the first motor had taught us a lot, the key takeaways were:
- The rocket should be small and the fuel casing must be light in weight, but bigger.
- The quantity of the fuel used must be more.
- There should be nothing blocking the nozzle bore.
Based on these takeaways, an entirely new launch vehicle, Mercury Redstone scale was built. The Engine casing, now much bigger, comprised close to 60% the total size of the vehicle. It was repurposed from the body of a refillable board marker that had a snug fit with the vehicle. Since, the propellant was still unchanged, we needed a large surface area for the burnt residue to flow out. So, the fuel was loosely packed and the end was covered with a thin cardboard/wood tape combination. It was intended to be barely strong enough to hold the fuel in the cannister and break or burn away completely during ignition.
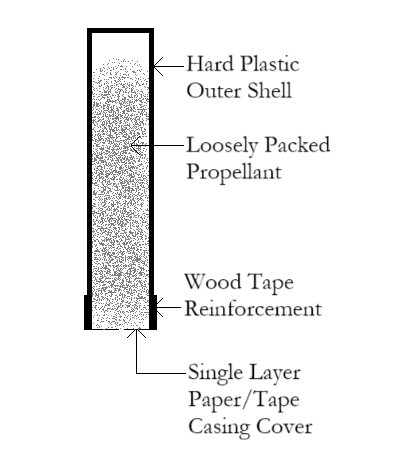 |
| rev 02 motor design |
However, this revision proved to be somewhat successful, but totally for the wrong reasons. The thrust produced was not due to the continuous burning and ejection of the propellant gases, but rather due to the initial impact of the propellant explosion. When the rocket lifts off by just a few centimetres, all the propellant would have burnt by then and the vehicle would just coast for rest of the flight.
Revision 03
As of now, this was the truly successful motor that we were able to design and build. Though, this idea was thought about initially, we had lacked the tools and technology to bring it to fruition.
 |
| 3D Printed nozzle and endcap |
Since the propellant used here was KNO3-Sugar in packed powder format (not casted), it called for a complete redesign of the motor. A PVC Casing that was sourced from commercially available CPVC Pipes, and the nozzle was decided to be 3D Printed, as by this time, we had fabricated, tested and tuned a few machines.
The nozzle and the end caps were 3D modelled and printed using PLA Plastic. The nozzle is basically a cylindrical tube having outer diameter of 18mm and a bore having internal diameter of 6mm. The length of the nozzle was 15mm. The end cap is essentially the same cylinder but without the internal bore. Although plastic is not a great nozzle material due to its low melting point, we theorize that it may withstand the thermal shock for a duration of around 600 milliseconds.